Form Validation in Flutter

Form plays the most important role for any app in world. Almost all the app in the world needs good form.
Suppose App asks user for mobile number and user says ANDROID. We know ANDROID can’t be someone mobile number unfortunately our app doesn’t know. If we were in place of App we could have ask the user again for a valid phone number. We can’t replace the app but we program our App smartly so that it can validate the user mobile number and other data itself.
Today you will How you can handle Form in Flutter and Validate the user input.
Let’s Get Started
First I am going to build UI for Our App.
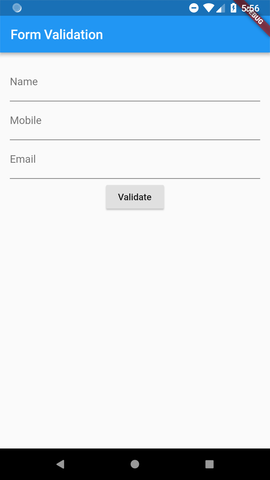
This is User Interface which I am going to build.
Here you can see that we are having 3 Text Field
> Name
> Mobile
> Email
We will validate all three input data as soon as we click on validate button.
UI Design Code
import 'package:flutter/material.dart';

void main() => runApp(new MyApp());

class MyApp extends StatefulWidget {
  MyApp({Key key}) : super(key: key);

  @override
  _MyAppState createState() => _MyAppState();
}

class _MyAppState extends State<MyApp> {
//  _formKey and _autoValidate
  final GlobalKey<FormState> _formKey = GlobalKey<FormState>();
  bool _autoValidate = false;
  String _name;
  String _email;
  String _mobile;

  @override
  Widget build(BuildContext context) {
    return new MaterialApp(
      home: new Scaffold(
        appBar: new AppBar(
          title: new Text('Form Validation'),
        ),
        body: new SingleChildScrollView(
          child: new Container(
            margin: new EdgeInsets.all(15.0),
            child: new Form(
              key: _formKey,
              autovalidate: _autoValidate,
              child: FormUI(),
            ),
          ),
        ),
      ),
    );
  }

// Here is our Form UI
  Widget FormUI() {
    return new Column(
      children: <Widget>[
        new TextFormField(
          decoration: const InputDecoration(labelText: 'Name'),
          keyboardType: TextInputType.text,
        ),
        new TextFormField(
          decoration: const InputDecoration(labelText: 'Mobile'),
          keyboardType: TextInputType.phone,
        ),
        new TextFormField(
          decoration: const InputDecoration(labelText: 'Email'),
          keyboardType: TextInputType.emailAddress,
        ),
        new SizedBox(
          height: 10.0,
        ),
        new RaisedButton(
          onPressed: _validateInputs,
          child: new Text('Validate'),
        )
      ],
    );
  }

  void _validateInputs() {}
}
Here you can see that I had used autovalidate. ‘autovalidate’ is used to validate the input as soon as we enter the data. So Initially I set it to false.
Reason that I initially set it to false because When user will open the form all the Fields will by default empty and as empty field is invalid. So, when user will open the form I don’t want to show invalid error.
Once user submit the form and if there is any validation error then We will start validating the input automatically[1] by updating _autoValidate to true.
Now we have a Form with some basic input fields i.e Name, Email, mobile number
There is named parameter ‘validation’ of TextFormField which is used to validate that particular Field. We will add that named parameter validation to all of the TextFormField. So, that we can validate our form easily.
new TextFormField(
  decoration: const InputDecoration(labelText: 'Name'),
  keyboardType: TextInputType.text,
  validator: (String arg) {
    if(arg.length < 3)
      return 'Name must be more than 2 charater';
    else
      return null;
  },
  onSaved: (String val) {
    _name = val;
  },
),
Here you can see that I had added two new parameter validator and onSaved.
Let’s have a look at validator and onSaved individually.
Validator [2]
validator: (String arg) {
    if(arg.length < 3)
      return 'Name must be more than 2 character';
    else
      return null;
  },
Here you can see that we are returning “Name must be more than 2 character” if input text length is less than 3 else we are returning null.
onSaved [3]
onSaved: (String val) {
    _name = val;
  },
OnSaved we are assigning the input text to _name variable.
Let’s update our method _validateInputs(). So, that you can easily understand onSaved and validator.
void _validateInputs() {
  if (_formKey.currentState.validate()) {
//    If all data are correct then save data to out variables
    _formKey.currentState.save();
  } else {
//    If all data are not valid then start auto validation.
    setState(() {
      _autoValidate = true;
    });
  }
}
As I earlier told you that there is method bool validate() defined under form class which is used to validate the form. As soon as method bool validate() is called all the validator[2] will be called. If it does get any string then it will show that string as error and if it does not get any string means no Error.
Suppose there is no error then we will call the method void save() and it will call all the onSave[3]. So, that all the form input could be stored in variable corresponding to each input Field.
Sometime there will error in validation because all user not very smart like you. So we need to think for that user also.
For all that user we will do auto validation[1] by updating _autoValidate to true.
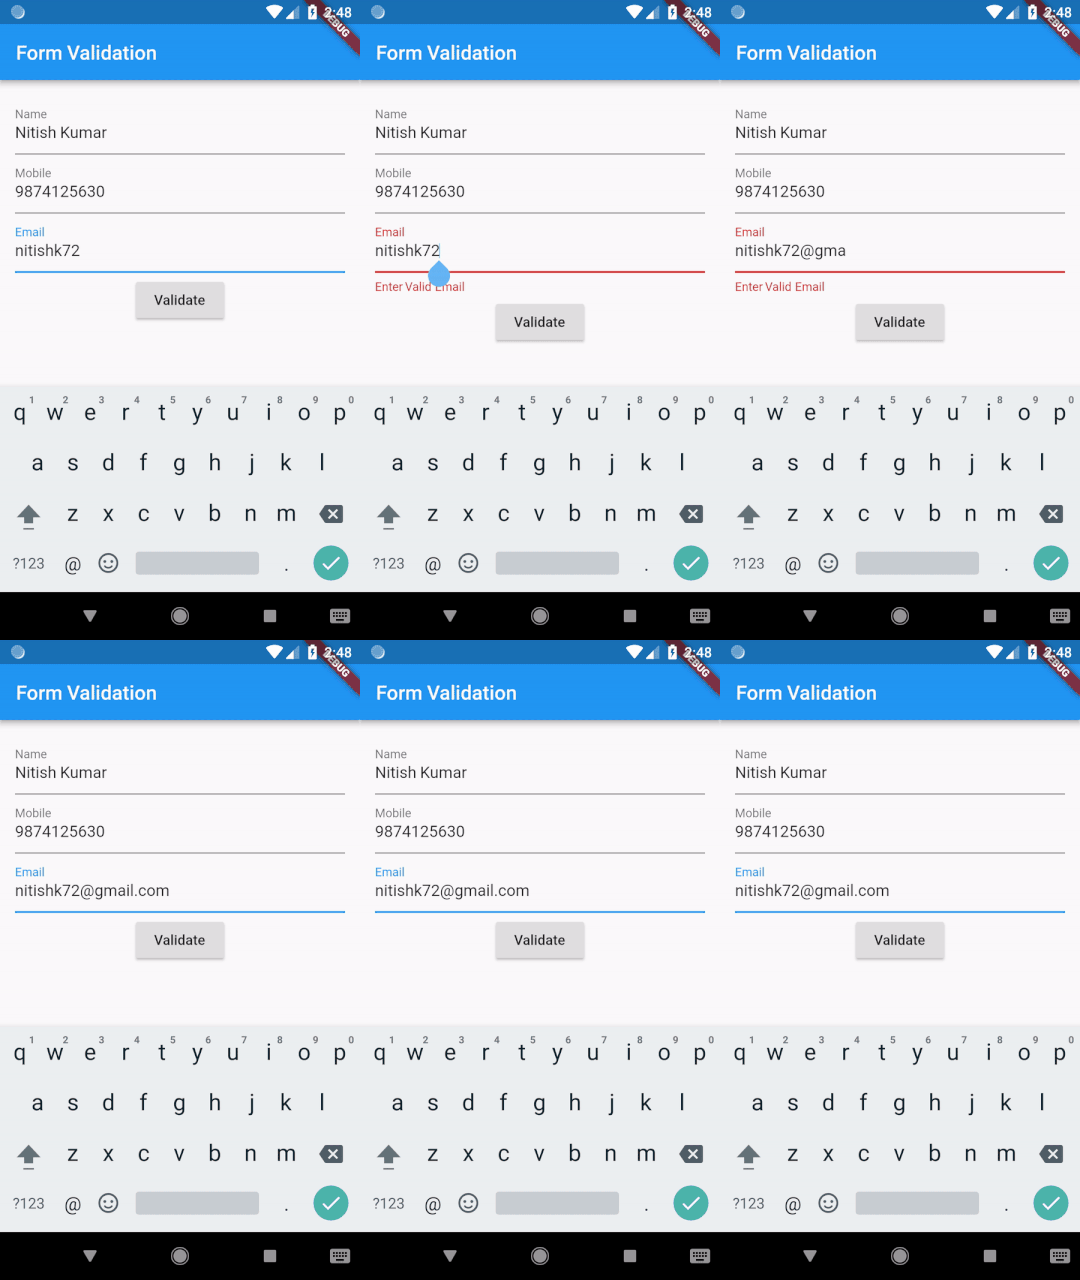
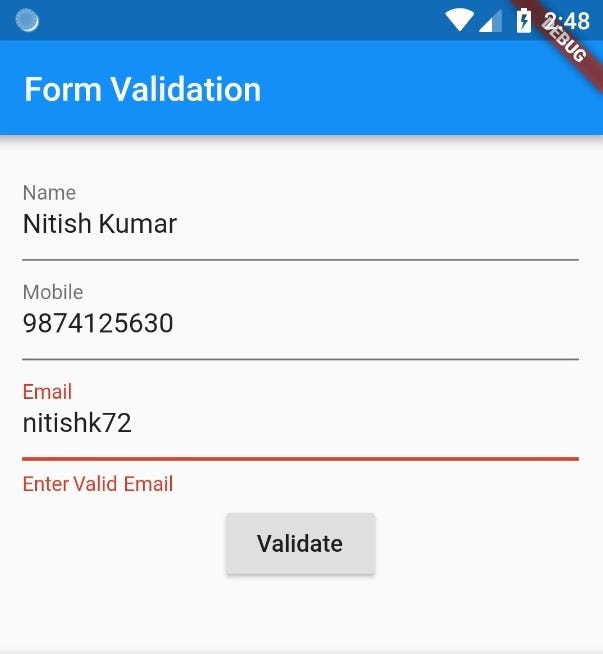
> Here you can see that how auto validation works.
> As soon as I write the correct email, Error got hides automatically.
> If I remove @ from the Email I get error again.
> For Email Verification I am using RegEx.
> I hope that you got idea that how auto validation works.
Let’s see all the code
  Widget FormUI() {
    return new Column(
      children: <Widget>[
        new TextFormField(
          decoration: const InputDecoration(labelText: 'Name'),
          keyboardType: TextInputType.text,
          validator: validateName,
          onSaved: (String val) {
            _name = val;
          },
        ),
        new TextFormField(
          decoration: const InputDecoration(labelText: 'Mobile'),
          keyboardType: TextInputType.phone,
          validator: validateMobile,
          onSaved: (String val) {
            _mobile = val;
          },
        ),
        new TextFormField(
          decoration: const InputDecoration(labelText: 'Email'),
          keyboardType: TextInputType.emailAddress,
          validator: validateEmail,
          onSaved: (String val) {
            _email = val;
          },
        ),
        new SizedBox(
          height: 10.0,
        ),
        new RaisedButton(
          onPressed: _validateInputs,
          child: new Text('Validate'),
        )
      ],
    );
  }

  String validateName(String value) {
    if (value.length < 3)
      return 'Name must be more than 2 charater';
    else
      return null;
  }

  String validateMobile(String value) {
// Indian Mobile number are of 10 digit only
    if (value.length != 10)
      return 'Mobile Number must be of 10 digit';
    else
      return null;
  }

  String validateEmail(String value) {
    Pattern pattern =
        r'^(([^<>()[\]\\.,;:\s@\"]+(\.[^<>()[\]\\.,;:\s@\"]+)*)|(\".+\"))@((\[[0-9]{1,3}\.[0-9]{1,3}\.[0-9]{1,3}\.[0-9]{1,3}\])|(([a-zA-Z\-0-9]+\.)+[a-zA-Z]{2,}))$';
    RegExp regex = new RegExp(pattern);
    if (!regex.hasMatch(value))
      return 'Enter Valid Email';
    else
      return null;
  }
Now you had seen all the code of form and validation.
Let’s see work of the function save().
_formKey.currentState.save();This line of code will call all the method corresponding to onSave of InputFormField. In every corresponding method we had assigned input field value to corresponding variable.
I think Now you got the idea that how form validation works and Now you can make a good form which will take only valid input.
If you face any difficulties in writing code. You can go to github and download this project.
I am new to Blogging. If you think that I need to more simplify the Blog Content then Please Let me know.

